Blackwing Lair
Overview
Blackwing Lair is located in BRM. If you've been to UBRS, you may have noticed a corridor with a (green) raid portal down one of the corridors. Like Molten Core, there is an easier way to enter once you've been attuned. The attunement quest is listed here. Basically, you have to kill the Quartermaster outside BRS and loot a note off of him, then kill the General in UBRS and interact with the orb behind him. Once you have done that, the orb behind the Quartermaster will take you to BWL if you're in a raid group.
Attunement
Map(s)
Quests
None?
Bosses & Items
Razorgore the Untamed
- Tier 2 Bracers - Bloodfang, Judgement, Wrath, Nemesis, Netherwind, Transcendence, Stormrage, Ten Storms, Dragonstalkers
- Arcane Infused Gem - Trinket, Hunter - Use: Next Arcane shot fired within 10 sec will detonate and cause 185 - 215 dmg to all enemies near the target.
- Gloves of Rapid Evolution - Cloth, Hands - +12 Sta, +12 Int, +32 Spi
- Mantle of the Blackwing Cabal - Cloth, Shoulder - +12 Sta, +16 Int, Equip: Increase Dmg & Healing up to 34.
- Spineshatter - 1h Mace - +9 Str +16 Sta, Equip: Increased Defense +5
- The Black Book - Trinket, Warlock - Use: 100% pet dmg, 100% pet armor for 30 sec.
- The Untamed Blade - 2h Sword - +22 Agi, +16 Sta, Chance on hit: Increase Str by 300 for 8 sec.
Vaelastrasz the Corrupt
- Tier 2 Belts - Bloodfang, Judgement, Wrath, Nemesis, Netherwind, Transcendence, Stormrage, Ten Storms, Dragonstalkers
- Dragonfang Blade - Dagger - 55.3 DPS, 1.8 speed, +13 Sta +16 Agi
- Helm of Endless Rage - Plate, Helm - +29 Sta, +26 Str, +26 Agi
- Mind Quickening Gem - Trinket, Mage - Use: Increase magic casting speed by 25% for 20 sec.
- Pendant of the Fallen Dragon - Neck - 12 Int, 9 Sta, 9 mana/5 seconds
- Red Dragonscale Protector - Shield - 2787 Armour, 51 Block, +6 Sta, +17 Int, +6 Spi, Equip: Increase Healing up to 37
- Rune of Metamorphosis - Trinket, Druid - Decrease mp cost of shapeshifting forms by 100% for 20 sec.
Death Talon Packs
There are 2 sets of these in the next room after Vaelastrasz the Corrupt they comprise of the following (listed known possible epics also):
- Boots of Pure Thought - Cloth Boots - +12 Sta, +6 Int Equip: Increase shadow spell dmg by up to 33.
- Cloak of Draconic Might - Cloak - +16 Str, +4 Sta, +16 Agi.
- Draconic Maul - 2h Mace - +27 Str, +19 Sta, Equip: + 2% to crit chance.
- Boots of Pure Thought - Cloth Boots - +12 Sta, +6 Int Equip: Increase shadow spell dmg by up to 33.
- Cloak of Draconic Might - Cloak - +16 Str, +4 Sta, +16 Agi.
- Draconic Maul - 2h Mace - +27 Str, +19 Sta, Equip: + 2% to crit chance.
- Boots of Pure Thought - Cloth Boots - +12 Sta, +6 Int Equip: Increase shadow spell dmg by up to 33.
- Cloak of Draconic Might - Cloak - +16 Str, +4 Sta, +16 Agi.
- Draconic Maul - 2h Mace - +27 Str, +19 Sta, Equip: + 2% to crit chance.
- Boots of Pure Thought - Cloth Boots - +12 Sta, +6 Int Equip: Increase shadow spell dmg by up to 33.
- Cloak of Draconic Might - Cloak - +16 Str, +4 Sta, +16 Agi.
- Draconic Maul - 2h Mace - +27 Str, +19 Sta, Equip: + 2% to crit chance.
Broodlord Lashlayer
This boss reduces his aggro against melee throughout this fight. This leads to aggro issues for ranged classes.
- Tier 2 boots - Bloodfang, Judgement, Wrath, Nemesis, Netherwind, Transcendence, Stormrage, Ten Storms, Dragonstalkers
- Black Brood Pauldrons - Mail, Shoulders - +12 Sta, +15 Int, +17 Agi, Equip: Restores 9 mp every 5 sec
- Bracers of Arcane Accuracy - Cloth, Wrist - +9 Sta, +12 Int, Equip: + 1% hit spells, Increase Dmg & Healling up to 21
- Heartstriker - Bow - 44 DPS, 2.6 Speed, +9 Sta, Equip: +24 Attack Power
- Lifegiving Gem - Trinket, Warrior - Use: Heal yourself for 15% of max hp, increase max hp by 15% for 20 sec.
- Maladath, Runed Blade of the Black Flight - 1h Sword - 56.4 DPS, 2.2 Speed, Equip: Parry + 1%, Increased Swords +4
- Venomous Totem - Trinket, Rogue - Use: 30% chance increase to apply poisons to target for 20 sec.
Firemaw
- Tier 2 Hands - Bloodfang, Judgement, Wrath, Nemesis, Netherwind, Transcendence, Stormrage, Ten Storms, Dragonstalkers
- Black Ash Robe - Cloth, Chest - +21 Sta, +22 Int, +17 Spi, +30 Fire Resist
- Band of Forced Concentration - Ring, +9 Sta, +12 Int, Equip: +1% to hit with spells, Increases damage and healing by up to 21
- Claw of the Black Drake - Fist, 56.3 DPS, 2.6 Speed
- Cloak of Firemaw - Back, 50 AtkPow, 12 Sta
- Drake Talon Cleaver - 2h Axe - +22 Str, +17 Sta, Chance on hit 240 dmg
- Drake Talon Pauldrons - Plate Shoulder - +20 Str, +20 Agi, +17 Sta, Equip: Dodge + 1%
- Firemaw's Clutch - Cloth, Waist - +12 Sta, +12 Int, Equip: Dmg & Healing up to 35, Restore 5 mp every 5 sec
- Natural Alignment Crystal - Trinket, Shaman - Use: 20% spell dmg, 20% heal, 20% increased mana cost for 20 sec.
- Primalist's Linked Legguards - Mail, Legs - + 2% crit chance to spells, + 1% chance to hit
- Ring of Blackrock - Ring - Equip: Dmg & Healing effects up to 19, Restore 9 mp every 5 sec
- Rejuvenating Gem - Trinket - Equip: Healing increase by 66 & restores 6 mp every 5 sec
- Scroll of Blinding Light - Trinket, Paladin - Use: Increase melee attack and spell castin by 25% for 20 sec.
- Taut Dragonhide Belt - Leather Belt - +17 Sta, Equip: +60 Attack Power, Dodge + 1%.
Ebonroc
- Tier 2 Hands - Bloodfang, Judgement, Wrath, Nemesis, Netherwind, Transcendence, Stormrage, Ten Storms, Dragonstalkers
- Aegis of Preservation - Trinket, Priest - Use: Increase armor 500, heal 35 dmg everytime you take melee or ranged dmg for 20 sec.
- Band of Forced Concentration - Ring - +9 Sta, +12 Int, Equip: + 1% hit with spells, Dmg & Healing up to 21.
- Dragonbreath Hand Cannon - Gun - 43.9 DPS, 2.8 Speed, +14 Agi, +7 Sta
- Drake Fang Talsman - Trinket - Equip: +56 Attack Pwr, + 2% to hit, + 1% dodge
- Drake Talon Cleaver - 2h Axe - +22 Str, +17 Sta, Chance on hit-fatal wound 240 dmg
- Drake Talon Pauldrons - Plate Shoulder - +20 Str, +20 Agi, +17 Sta, Equip: dodge + 1%
- Ebony Flame Gloves - Cloth, Gloves - +17 Sta, +12 Int, Equip: Increase shadow spell dmg up to 43
- Malfurion's Blessed Bulwark - Leather, Chest - +40 Str, +22 Sta
- Rejuvenating Gem - Trinket - Equip: Healing increase by 66 & restores 6 mp every 5 sec
- Ring of Blackrock - Ring - Equip: Dmg & Healing effects up to 19, Restore 9 mp every 5 sec
- Shadow Wing Focus Staff - Staff - +22 Sta, +40 Int, +17 Spi, Equip: Dmg & Healing up to 56
- Taut Dragonhide Belt - Leather Belt - +17 Sta, Equip: +60 Attack Power, Dodge + 1%.
Flamegor
- Tier 2 Hands - Bloodfang, Judgement, Wrath, Nemesis, Netherwind, Transcendence, Stormrage, Ten Storms, Dragonstalkers
- Circle of Applied Force - Ring - +12 Str, +22 Agi, +9 Sta
- Dragon's Touch - Wand - +7 Sta, +12 Int, Equip: Dmg & heal increase by 6
- Drake Talon Cleaver - 2h Axe - +22 Str, +17 Sta, Chance on hit-fatal wound 240 dmg
- Drake Talon Pauldrons - Plate Shoulder - +20 Str, +20 Agi, +17 Sta, Equip: dodge + 1%
- Emberweave Leggings - Mail Legs - +17 Agi, +22 Sta, +12 Int, +35 Fire Resist
- Herald of Woe - Mace - +31 Str, +22 Sta, +20 Int, +17 Spi
- Rejuvenating Gem - Trinket - Equip: Healing increase by 66 & restores 6 mp every 5 sec
- Ring of Blackrock - Ring - Equip: Dmg & Healing effects up to 19, Restore 9 mp every 5 sec
- Shadow Wing Focus Staff - Staff - +22 Sta, +40 Int, +17 Spi, Equip: Dmg & Healing up to 56
- Shroud of Pure Thought - Cloak - +10 Sta, +11 Int, Equip: Healing up to 33, Restore 6 mp every 5 sec.
- Styleen's Impeding Scarab - Trinket - Equip: Chance to block + 5%, Block value of shield + 24, Defense + 13
- Taut Dragonhide Belt - Leather Belt - +17 Sta, Equip: +60 Attack Power, Dodge + 1%.
Chromaggus
- Tier 2 Shoulders - Bloodfang, Judgement, Wrath, Nemesis, Netherwind, Transcendence, Stormrage, Ten Storms, Dragonstalkers
- Angelista's Grasp - Cloth Belt - +17 Sta, +20 Int, +13 Spi, Equip: +2 % chance to hit with spells.
- Ashjre'thul, Crossbow of Smiting - Xbow - +7 Sta, Equip: +36 Ranged Attack Power.
- Chromatic Boots - Plate Boots - +20 Str, +20 Agi, +12 Sta, Equip: + 1% to hit.
- Chromatically Tempered Sword - 1h Sword - +14 Str, +14 Agi, +7 Sta
- Claw of Chromaggus - Dagger - +17 Int, +7 Sta, Equip: Dmg & healing up to 64, Restore 5 mp every 5 sec.
- Elementium Reinforced Bulwark - Shield - +23 Sta, Equip: +19 Block value of shield, Defense +7
- Elementium Threaded Cloak - Cloak - +13 Sta, Equip: Dodge + 2%
- Empowered Leggings - Cloth Legs - +12 Sta, +12 Int, +24 Spi, Equip: Healing effects up to 77, + 1% critical strike with spells
- Girdle of the Fallen Crusader - Plate Belt - +20 Str, +10 Agi, +15 Sta, +17 Int, +13 Spi
- Prmalist's Linked Waistguard - Mail Belt - +16 Str, +13 Sta, +16 Int, +15 Spi Equip: Dmg & Heal up to 20
- Shimmering Geta - Cloth Boots - +13 Sta, +17 Int, Equip: Restores 12 Mana every 5 sec
- Taut Dragonhide Gloves - Leather Gloves - +20 Sta, +20 Int, Equip: Crit + 1%, Restores 6 mp every 5 sec.
- Taut Dragonhide Shoulderpads - Leather Shoulder - +30 Sta, Equip: +46 Attack Power
Nefarian
- Tier 2 Chest - Bloodfang, Judgement, Wrath, Nemesis, Netherwind, Transcendence, Stormrage, Ten Storms, Dragonstalkers
- Head of Nefarian - Item Turn in Similar to Onyxia Head
      Rewards - Master Dragonslayer's Medallion - Necklace - +14 Agi, +24 Sta, Equip: +7 Defense.
                Master Dragonslayer's Orb - Off Hand - +10 Sta, +14 Int, Equip: Increase Dmg & Healing up to 28.
                Master Dragonslayer's Ring - Ring - +14 Sta, Equip: +44 Attack Power, + 1% to hit.
- Archimtiros' Ring of Reckoning - Ring - +14 Agi, +28 Sta
- Ashkandi, Greatsword of the Brotherhood - 2h Sword - +33 Sta, Equip: +86 Attack Power
- Boots of the Shadow Flame - Leather Boots - +22 Sta, Equip: +44 Attack Power, + 2% to hit
- Cloak of the Brood Lord - Cloak - +10 Sta, +14 Int Equip: Increase Dmg & Healing by up to 28
- Crul'shorukh, Edge of Chaos - 1h Axe - +13 Sta, Equip: + 36 Attack Power
- Lok'amir il Romathis - 1h Mace - +10 Sta, +18 Int, +8 Spi, Equip: Increase Dmg & Healing effects up to 84
- Mish'udare, Circlet of the Mind - Cloth Helm - +15 Sta, +24 Int, +9 Spi Equip: Dmg & Heal up to 35, + 2% chance spell crit
- Neltharion's Tear - Trinket - Equip: Increase Dmg & Healing effects up to 44, + 2% to crit chance.
- Prestor's Talisman of Connivery - Necklace - +30 Agility, Equip: + 1% to hit
- Pure Elementium Band - Ring - +9 Sta, +10 Int, +10 Spi, Equip: Increase Healing by up to 53
- Staff of the Shadow Flame - Staff - +24 Sta, +29 Int, +18 Spi, Equip: Increase Dmg & Healing by up to 84, + 2% crit chance
- Therazane's Link - Mail Belt - +22 Sta, +12 Int, +12 Spi, Equip: +44 Attack Power, + 1% to crit
Strategies
(Note: boss abilities gleaned from this strategy page)
Razorgore the Untamed
Razorgore is the first encounter in BWL and the first boss encounter. The fight is very complex and the roles for many classes are quite different than in any of the Molten Core boss fights. The raid in this fight is like a line of dominoes; if just one person goes down, the fight can be unrecoverable.
The goal of the fight is to destroy all the eggs while controlling the mobs that spawn. The mages are killed as they spawn, and the non-mage mobs are kited around the room, while someone uses the orb to control Razorgore. Razorgore has an ability that allows him to break the eggs, which the controller uses as soon as it is available. Once all the eggs are destroyed, all of the mobs that have been kited will run out of the room and Razorgore will become uncontrollable. At this point, Razorgore is killed.
Tichondrius notes
Kudos to Champain on Tich for compiling this guide!
The layout
This is a badly drawn but hopefully understandable picture of Razorgore's room and the important positions. It might be useful refer to this as you go through the strategy.
The Beginning
The room is filled with eggs. Two guards and a controller stand on the platform in the southwest edge of the room next to the controller orb and Razorgore stands on the platform on the northeast side of the room. The raid begins positioned in the south corner.
We begin by gun pulling each guard and the controller to the raid. As soon as the pull happens, the first orb controller has to immediately start channeling the orb. This is not done on the platform. The orb can be accessed and channeled from the ground below the platform.
The initial three mobs aren't tough. A warrior is assigned to each one and the raid just assists the MA to kill each in turn. One of them does cast mind control that will need to be dispelled by priests. When the mobs are down the four mage kill groups move into their positions, hunters and warlocks and druids spread out to cover the spawn points and shamen place their totems and get ready to kite. There is a small delay between this and the first spawns.
From this point its easiest to cover the roles of each class sperately.
Druids, warlocks, hunters
These three classes are responsible for controlling and kiting the dragon kin. Druids must choose one and keep it slept for the duration, hunters put a hunter's mark on one dragon kin per hunter and take responsibility for kiting it and warlocks choose one and chain fear it. Each person from any of these three classes is responsible for controlling one dragonkin.
It is also important to establish a little bit of aggro through whatever means to make sure your dragonkin is chasing you and not one of the shamen or healers. Dragonkin aren't affected by earthbind, but they move slowly and it shouldn't be too tough to evade them. If it gets close, run up the ramp to the platform and wait for the dragonkin to get right up on the platform too. You can jump off but the dragonkin can't and will have to move down the ramp, giving you some breathing room.
Mage kill groups
Since the mages can AOE, they are the only mobs that are killed instead of kited. One group made out of warriors, rogues, mages and priests is located at each of the four spawn points. As soon as a mage spawns, it should be jumped and killed as fast as possible. They are fully stunnable and interuptable, so kick and pummel should be used libreally. If more than one spawns at one point at once, the extra can be polymorphed.
Priests should be heaing as lightly as possible. One greater heal is probably enough to get you jumped by the kited dragonkin, so keep healing to a minimum. It may feel counter intuitive to stand around with full mana, but its about the only way to stay alive. Keep inner fire up on yourself and be ready to shield and fade if necessary. Although you don't play much of a role during the kiting, as much healing as possible is needed for killing razorgore.
Shamen
Shamen have the most crucial role in the first part of this fight. It is your job to aggro a bunch of legionaires and kite them in a path around the darker square pattern on the floor. You will be assigned a totem position and you have to replace the totem there everytime your cooldown is up and you pass the position.
As the legionaires spawn, you fire off an earthshock to establish aggro on the mob, but don't stop. As it moves into earthbind radius it is slowed and you can comfortably keep ahead. Now, more legionaires will spawn and you need to keep pinging them with earthshock to keep the aggro going.
If you are dazed, you're dead. Strafeing instead of running straight can help you avoid this, but you should have a supply of swiftness potions just in case of emergency. No one will be healing you, so there is very little room for error. Shamen have the toughest job for this part of the fight and it will take them a while to learn how to do it. So have some patience guys
The Orb Controllers
A rogue will start off as the orb controller. He will position himself beside the platform under the orb and as soon as the pull happens begin to channel the orb. This will give him control of Razorgore and the ability to use his skills.
The most important of these is break egg. It has a five second cooldown and must be used to destroy every egg in the room. Between breaking eggs, Razor can sleep dragonkin. This should be cast on any dragon running around without a mark over its head. Every time the break egg skill is up, it has to be used as quickly as possible.
The channeling on the orb lasts one minute. The rogue should make sure that when the channeling is about to expire, Razorgore is on the other side of the room, so that there is time to rechannel before Razor comes and wafflystomps him. As soon as it is channeled, the orb debuffs the channeler, making it impossible for that person to start channeling again till at least one minute has passed, so its important that it lasts the full duration.
Midfight
There will be many dragonkin running around being kited, feared and slept. There will be many many legionaires swirling around the earthbind totems in the middle of the room and shamen running for their lives. All the mages will be dead and the spawns will have stopped. At this point in the fight, the raid is balanced on a knife edge. If a shaman goes down, squads of legionaires are going to run free and start eating people for dinner.
To get things under control, a warrior will take over channeling the orb and the rogue will vanish to lose Razorgore's aggro. The warrior walks Razorgore into the middle of the swirling mass of legionaires and does a big AOE, pulling them all onto him. The legionaires kill Razorgore very quickly, so the warrior must control him and try to group them all up as much as possible and as far away from the orb as possible. He will then relinquish control of the orb.
When he does this, all of the legionaires will come after him. Since he was controlling Razorgore when he AOE'd, the aggro this generated is transferred directly to him. He is now kiting the whole group of legionaires. Shamen need to move to their totem location, start regenerating mana and keep their totems up. All other warriors with piercing howl should be casting it around the fringes of the legionaires as back up for the totems.
When the main physical tank lets go of the orb, the main fire tank takes control. He is responsible for controlling Razorgore until the last eggs are broken.
End fight- All eggs broken
As soon as the last egg is broken, all of the dragon kin and legionaires flee the room through the western gate. Razorgore becomes uncontrollable and goes nuts. The first person he will come for is the last person who controlled the orb-- controlling the orb causes a large amount of aggro. If all went well, that person should be the main fire tank. He will pop shieldwall right away to give healers a chance to recover and will pull Razorgore into the south corner.
The main physical tank will be second on the aggro list. He moves in to Razorgore and stands on the opposite side of him to the main tank and starts building aggro. Pretty soon Razorgore will cast conflagrate, just like General Drakkisath, the end boss in UBRS. When he does this, he will turn to the main physical tank and start attacking him.
Conflagrate will break after 5-10 seconds and the main fire tank taunts Razorgore back, and so on.
Two priests are assigned to healing the fire tank and the rest look after the main physical tank. Ranged and melee DPS need to be aware of Razorgore's fire AOE which does about 600-1000 damage per bolt and goes off every 5-10 seconds. Once the fuight is stabalised, its just a matter of burning him down. The main challenge is to keep enough of the raid alive long enough to get all the eggs broken.
General tips
- All classes in the mage kill groups need to keep their aggro to a minimum
- Limited invulnerability potions are extremely useful
- If the raid wipes, run back. Don't waste soulstones, don't ankh and don't wait for a res!
- When he dies, the gate to Vael will open. Be ready ro run through and catch the six goblins, three on each side of Vael's head. These guys drop elementium, but you have to be very quick to get them all.
- Be ready to face a massive repair bill. It takes a long time to learn this fight and once you do, its a beautiful thing. Till then its a bloody expensive mess.
- Learn to play your class!!!!
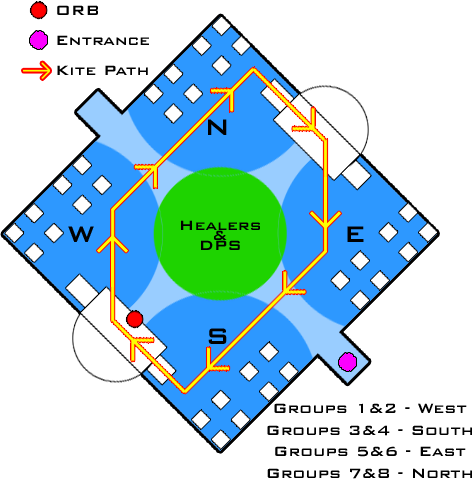
Stormrage notes
Notes originally written by Gnollguy on the Carpe Aurum forums: First we are going with a 4 corner strat but our healers will be more towards the middle of the room.
So if you look at this image [awesome image made by Pesmerga (Miodvitnir - Hunter)]
http://i18.photobucket.com/albums/b150/UCPesmerga/Razorgore.png
you can see more or less what we are doing for positions.
We split the raid into 4 teams. Each team occupies one corner.
Groups 1 and 2 go West
Groups 3 and 4 go South
Groups 5 and 6 go East
Groups 7 and 8 go North
The exception to this is the one paladin and the one warrior who will control razorgore. We will try to have them in group one and balance accordingly.
The healers are also going to be living in the middle of the room. This is so that if they get aggro it's much easier to tell. We will still have two kiting warriors and 4 mage killing warriors.
PHASE I (Break the Eggs)
Orb Team
We will have a warrior and paladin on orb duty, currently the warrior is the main controller and the paladin is backup (may switch to 2 pallies later as FR allows). The person who is controlling while the last egg is broken is essentially just conflag bait, and we may have a pally take this duty, since the main requirements are very high FR and heavy armor.
A priest will have to make sure PW:S is up at all times just in case something goes wrong. Many times this is a waste of mana, but sometimes it is vital. The paladin back-up will act as an OOC rezbot as well since reports are that waiting around as a back-up controller and doing nothing will often drop you out of combat. You generally have 2-3 seconds to warn that the back-up controller will be needed so breaking a rez and running back to the orb are doable.
DPS
A rogue (or hunter, when there aren't enough rogues) in each team is appointed Main Assist. Mages, Hunters, Warlocks, Paladins, and Rogues in the team will help kill the mage that the rogue in that corner targets. We will also try to have one hunter in each corner who can scatter-shot, and they will try to shoot mages that spawn to give the dps caller a little more time to target the mage and call dps.
Warriors
Warriors are our main kiters for this encounter. Currently, warriors kite both the legionnaires and the dragonkin. (We might change the dragonkin strat later to having hunters kite one each and druids sleep one each. We might decide that the corner warriors are going to try and help tank and kill everything as it spawns.)
There will be a warrior in each corner and two warriors in the middle. Corner warriors will act as DPS early on, but your main job is to try and get early mobs and kite them. Try and space out as much as possible, so that all mobs get picked up quickly by a warrior who is running by. Our warriors typically prefer a full circuit of the room while kiting. Remember that you can jump down the ramps when you need to get ahead of the group that you're kiting.
The two warriors in the middle will be limited healer protection and orb controller protection. If a mage gets in there, pick it up, shield bash or pummel it and get it to a kill zone. If a legionnaire or dragonkin ends up in there taunt it, but try not to put too much aggro on it and see if you can get it near a kite path. I know that taunt gives you all of 2 seconds of top of hate list but since those mobs might be getting CC'd or you want them on another kiter you have to try and keep aggro low. If a couple mobs come in at once, one of you picks them both up and you just become a kiter. This is why it is limited protection but the idea is to keep the healers from having to use their own tricks as long as possible.
Healers
Paladins are not counted the paladins as primary healers for this phase, they can get in the thick of the corners to do what they can for DPS and tanking. Heal when possible, but you'll be in the corner with your group rather than in the middle with the healers.
Druids and priests will be trying to stay as close to the middle of the room as they can while staying in healing range. You not only get to do what you can for DPS but you get to try and keep the kiters up too. Druids should be hibernating a dragonkin, but we'll also be seeing if it's possible to have druids heal the kiting warriors with HoTs. Priests healing DPS can fade to drop aggro till that mob is dead. In addition to the priest who is ready to shield the controllers, we will have one watch the kiters for shielding and HoT application.
PHASE II (Kill Razorgore)
When all the eggs are broken the room clears and phase 2 begins. Everyone except for two warriors and the conflag bait should stop doing anything that might generate aggro (Fade/Vanish/Feign Death are good choices here). Razorgore will head to the person who broke the last egg, but he might have reason to turn around suddenly after that.
Tanking
The warrior (or possibly paladin) who broke the last egg will end up being the "MT", the one person who has the most aggro on Razorgore. However they are not the one who is really controlling Razor. They will run to the North corner was and Razor will come after them. This means that everyone in the North corner needs to clear out fast (up the ramp is a good way). Razorgore's conflag is a frontal cone and it has a decent range - there is a good chance that he will fire this off before getting in melee range with the bait.
The ST will be a warrior who simply lays into Razor as fast as possible. In addition to the MT, there will be 2 other warriors (the secondary and tertiary tanks) who get as close to Razor as possible when the last egg is going down and they lay into him. Sunder, revenge, shield slam, shield bash. Generate aggro as fast as you can because when that conflag hits the bait you want to be second and 3rd on the hate list. Whoever lands the first sunder gets to call out on TS that they are second tank. The other warrior should try to build aggro a little slower to make sure that they are only 3rd. We use 2 warriors for this in order to control Razor as fast as possible and to have all of the damage he does directed at warriors.
The other 2 tanks will want to try and stand 90 degrees to the MT. Razor will be facing the corner so you should be on the side by the door to Vael's room (the West side of the North corner). Keep in mind the conflag bait will be running around and can travel pretty far. Razor will conflag them again anywhere from immediately after conflag wears off to a few seconds after. Be aware and stay the hell away from the conflag cone.
The tertiary tank will end up being with the other melee DPS.
DPS
If you get aggro, run to the tanking spot immediately.
Melee DPS
You do nothing until you see that the secondary tank has aggro, at that point you attack. Melee DPS will be standing across from the conflag bait tank and 90 degrees to the the secondary tank (backs directly to the center of the room). You all need to be aware that Razor will shift and that the conflag tank has no control over where he will stop. Be aware. Stay out of the conflag cone. If you get conflagged, you are dead. You will not get healing, there will not be any healing for you.
Ranged DPS
You do nothing until you see that the secondary tank has aggro, at that point you attack. Razor can teleport people to him that are out of range and have aggro be aware of that. There is a range on the fireball volley (FR gear does help, yes) and you can sometimes duck behind objects to avoid it. Hunters will use Feign Death cycles.
Healing
We don't know who will be alive. We aren't even sure who will be the secondary tank but we should have a good idea, a few seconds at least. Do not stand at 40 yards of the people you are healing. Positioning is fluid, the conflag bait moves around a lot. 30 yards is probably better. The conflag bait is completely helpless in the conflag. Can't drink, can't use specials can't control movements. They will suck your mana but you want to them alive to help control the fight. The secondary tank will take damage like they do from any other raid boss, they take a lot of healing too. Your class leader will give you assignments. Be ready to be fluid though. Keeping the conflag bait and the secondary tank alive is your primary goal. If one of them dies it is likely a wipe, though we are trying to set things up so that we can recover.
Notes
If the confag bait dies, the secondary tank will end up being the new conflag bait, and hopefully the designated tertiary tank will still be 3rd on the aggro list to be secondary tank, but that is hard to tell. So be ready for a call of "Heals on XXX" whoever we call to heal is tanking.
If the conflag or the secondary tank dies, DPS has to stop unless Razor is nearly dead. Hunters FD, rogues vanish or stay alive to die before a healer does.
The warriors who may step up to tanking don't stop, they keep building that aggro. Cancel salvation if you have to. We know that if he doesn't turn on that 3rd warrior that he is likely looking at a healer in this fight because of how much healing has to be done, he might just munch on a rogue or two on the way, I think that vanishing is a better idea. If a mage or lock or a hunter that can't feign gets aggro head to the tanking corner. Healers try to spread out so that you don't all get conflagged when he comes for one of you. I'm still hoping that another warrior can stay third but without any rage being generated from taking damage it isn't as likely.
AFTER RAZORGORE DIES
So what will we do after Razorgore is dead? Well first calmly wait in the middle of the room, rez up and handle loot. Then onto the goblins.
The Goblins
After that a priest will mind vision on Vael and we can assign goblin targets.
The goblins will try to flee the room when we enter. They stop running as soon as they take damage. Hunters will use pets with dash, or if that's not possible, will close to bow range with Aspect of the Cheetah on and fire off an arcane shot as soon as possible to halt the goblins.If there aren't enough hunters, we will also use druids in cat form and rogues with sprint chasing goblins. A warrior will be assigned to each one to tank it after it stops.
Only the Master Looter should loot the goblins, since they drop something we'll need later in BWL.
Vaelastrasz the Corrupt
Vael is the second boss in Blackwing Lair and is a really unique fight. He requires a very different play style than any other boss and is a lot of fun. But he is also one of the most difficult fights to master. Due to BA targeting the fight has large luck componenet that can become very frustrating.
The Buffs
At the beginning of the fight Vael will buff everyone with the Essence of Red buff. This amazing buff adds 500 mana per tick, 20 rage or forty energy and lasts for three minutes. Effectively, this buff gives you unlimited resources for the three minutes it is in effect. If it times out and Vael still isn't dead, you're in big trouble.
Vael also has a pulsing fire damage AOE, dealing 600 fire damage per tick. This one doesn't have a time limit, but each pulse is resistable. Minimising the damage form this aoe is the rason fire resistance gear is required. If the healers lose their essence of the red, they will swiftly run out of mana trying to keep people healed. The pulses also interrupt casting, greatly reducing the effectiveness of any casters with channeled spells, as they will be getting constant interrupts.
Burning adrenaline is the other crazy buff. This makes all spells instant cast and double damage and is cast only on the person on top of his aggro list (the tank hopefully) and random mana users throughout the fight. Sounds good? Yeah. But not for long. Your maximum health is reduced by 5% per tick for 15 seconds, and then you explode in a tribute to Baron Geddon. Just like Geddon's living bomb, you will deal big aoe damage to everyone around you, so as soon as you get the buff move to the empty areas behind Vael's tail or next to the stairwells on either side of the tank position. You get a CTRA warning and your name will be caled in TS. Be ready to move!
Tichondrius notes
Kudos to Champain on Tich for compiling this guide!
The positioning on Vael is similar to Onyxia. Vael has a frontal aoe and a tailswipe so the raid has to stay to either side of him. One the east side, there will be all the ranged dps, the rogues and the the healers not in the warrior groups. In the west, the warriors and everyone in warrior groups.
How the Fight Goes The start
The first tank will engage in the maintank position and immediately begin mashing his sunder armour and heroic strike keys to build crazy aggro fast. All other warriors will hold off for a couple of seconds then begin doing the same. The idea is to keep all the warriors on top of the aggro list to allow the aggro to switch to another warrior when the tank goes down.
Shamen and any spare druids are on tank healing. Turn your CTRA heal cancel off because you have unlimited mana and spam your quickest dirtiest heals on the tank. Most priests and druids will be assigned to healing their party. Priests are particularly good at this as prayer of healing is perfect. Priests should be able to toss heals to the main tank pretty frequently. Priests, remember to shield yourself and the shaman in your group whenever you can to enable uninterupted casting. Druids have it tougher; keep rolling through everyone in your group healing as well as you can. You shouldn't have too much keeping yourself and four others up.
All dps guys should be going as hard as possible without pulling aggro. Keeping the damage going like crazy is key; Vael has to be dead in the three minutes.
Periodically, a mana user will be hit with BA, hopefully not a healer. If you get BA, move to a safe zone and chain cast your spells. Make the most of your crazy dps while it lasts. If BA kills you, you don't have take a durability hit, so rejoice!
The First Transition
45 seconds into the fight, when Vael is at about 22-23% the person on top of the aggro list, the first tank, will get burning adrenaline. This is effectively a 10 second warning that the tank is about to die and that the second tank is about to get aggro. Rogues should immediately vanish to clear their aggro, hunters should feign and priests should fade. Everyone else should ease off for a few seconds to ensure the warriors are next on the list.
The tank's max health will be slowly lowering and lowering. Before long, one tick of the fire dot Vael puts on the tank will do more damage than the tank has life, and the first tank will bite the dust. The second tank will then take aggro and Vael will turn to face that warrior.
This is the tricky part. The shamen need to switch targets to heal the warrior using either a /assist Vael macro or using the Maintank's target's target windows. Either way, the heals will ahve to start landing very fast or the tank is going to get a close up view of the Blackwing mason's workmanship. The new tank will also have to very quickly move into the main tank position. If he is too slow, casters may get tail whipped and the other warriors may be cleaved or flame breathed. Any of these will spell the end of the attempt. The move has to be very very quick.
If you aren't the warrior who gets aggro, take it easy for a few seconds to that aggro doesn't bounce back and forwards between you and the new tank.
The Rest of the Fight
Everyone maxes their dps and keeps burning him down. Every 45 seconds the tanking warrior will be hit with burning adrenaline and another transition needs to happen. This will be identical to the first, minus the vanishes. All rests on the ability of the healers to switch targets and the warriors to take aggro and move into position quickly.
Warriors, remember to bring a fast one hander. Chaining very quick heroic strikes and sunder is the easiest and best way to build some crazy aggro.
Stormrage notes
Put on your FR gear for this. For a good shot at this encounter, we want the whole raid around 200 unbuffed or better, get as high as you can, even if you're dropping stats.
The room is safe until we talk to him and start the encounter. Positioning is similar to Onyxia, you want to stay along the sides of him, and don't go near his tail. DPS will be along the wall nearest to Razorgore's room. Healers will spread out a bit, you'll have a tank to heal but you will likely not be in that tanks group and you may be on the other side of the raid. That shouldn't be an issue as the tank will be close enough to you to heal when they are in need of healing.
We will be establishing a tanking order by trial and error over the course of our attempts. Right now that looks to be Gnolack, Anadrol, Seiki, Darian ... right now, we're not sure where exactly the other warriors will fall in the order. (Update by martini: I think at this point that our tanks know where they are in the order, but I don't! Will update as info becomes available.)
All the warriors except the first MT will start with Salvation up. The first 5 will start in defensive stance for more aggro on special skills. Every 5 seconds, the next warrior in the list will remove salvation (i.e. warrior 2 after 5 seconds, warrior 3 10 seconds after the start of the encounter, and so on).
Damage to the MT is very fast. And when he dies or gets burning adrenaline, healers will have to be quick to get on the other tank (a macro to /assist Vaelestraz might help with this). The next tank has to be quick to move to keep Vael in position. This is a mad DPS dash and the warriors, even the tank, will be executing a lot if we make it through the first 15 - 20 seconds.
Death Talon Packs
There are 2 sets of these in the next room after Vaelastrasz the Corrupt they comprise of the following:
- Death Talon Flamescale
- Death Talon Captain
- Death Talon Seether
- Death Talon Wyrmkin - have the same fire attack as Razorgore, shoots a fireball at everyone in range and LoS.
The packs always have 1 Captain and 1-3 each Seether, Flamescale and Wyrmkin to make a total of 6 mobs in the pack.
Tichondrius Notes
The main body will stay in Vaelstrasz's room, while the Main Tank (MT), designated Off Tanks (OT), Druids and Hunters will go upstairs to the entranceway of the room that contains the Death Talon Packs. Usually the MT assigns targets as follows (also listed in order of pwnage): **Note, not covering healing roles at this point, by now the healers should be experienced enough in 40 man raids to work it out :); and all I know about healing is HEAL ME.
- Death Talon Captain - This target is assigned to the MT, once pull starts, agro is achieved and the MT jumps down to Vael's room to the main body. The Captain is the first mob killed.
- Death Talon Flamescale - Designated OT(s) are assigned to these, once pull starts, they will agro their perspective target and then jump down to Vael's room. These are killed after the Captain, if there are multiple Flamescales the Main Assist (MA) will designate which one is killed 1st.
- Death Talon Seether - Designated hunters will kite their assigned target around the room, utilizing the ramps to get the Seethers up above main body as much of the time as possible. It helps to turn off all tracking and put a hunter's mark on your target, the only blip on your minimap will be the Seether. You need to tag the Seether occasionally, to keep agro, which may lead to it getting a little close, as they do have a fireblast that does around 1500-1700 damage; you may want to use Aspect of Cheetah for brief periods (careful in using as if you get blasted you may get stunned) or Swiftness Potions to get a little bit of separation. These are killed one at a time, MT or MA will designate which one is to be killed 1st if there are multiple Seethers, the other one(s) are kited until the hunter is notified it's his turn.
- Death Talon Wyrmkin - Designated Druid(s) sleep the Wyrmkin when the pull begins, and continue sleeping the assigned Wyrmkin until all other dragonkin are killed. The MT or MA will designate which one is to be killed 1st if ther are multiple Wyrmkin, the other(s) are slept until the druid is notified it's his turn.
Rinse and repeat for the second pack!!!
Stormrage Notes
The main body will stay in Vaelstrasz's room, including the tanking warriors. Hunters and Warlocks will go upstairs to the entranceway of the room that contains the Death Talon Packs. Warrior CL assigns targets to warriors, and hunters target off of the warriors. The hunter pulling to the MT starts the pull.
- Death Talon Flamescale - Pulled by hunters to their designated off-tank, killed first or second.
- Death Talon Seether - Pulled by hunters to their designated off-tank, killed first or second.
- Death Talon Captain - This target is assigned to the MT. A hunter pulls him, and jumps down to the MT's position, killed after the flamescale(s) and seether(s).
- Death Talon Wyrmkin - Warlocks will keep these mobs perma-feared on the upper level of Vael's room, and only bring them down one at a time when the other mobs are dead.
Suppression Room(s)
Your raid should stay in a tight group, ranged attackers should never go left or ahead of your group and should always use minimum range required for attacking. In some cases your ranged attackers may have to melee or use close range spells as it is extremely important not to pull adds if at all possible.
You start by placing your group just inside the door on the left edge of the first suppression room. First mobs to be peeled off should be the roaming Hatcher or Taskmaster group, just take the first one available with a clean pull. This gives you some breathing room to start proceeding down the right side. Follows is a brief description of items/mobs you will need to interact with or kill, then some basic strategies.
Suppression device
These devices give you a very nasty aura - it reduces your run speed, attack speed and cast speed. This is where your rogues come into play, with their disarm trap skill they can disable the suppression device for a period of time. Keep in good contact with your rogues so that you don’t run the whole raid into a suppression device.
The Whelps
The whelps can hit hard, but go down fairly easy to AoE spells, this is where your mages and warlocks shine for this portion of BWL, and even hunters can use volley here to help with taking them down quicker.
The Hatchers
These hatchers aren’t as easy as the whelps, they have and ability called Growing Flames - it’s a short proximity area of effect flamestrike, with one difference. It doesn’t do that much damage in the beginning (around 50 fire damage) but stay in the affected area and it will climb up to 1000+ damage per tick very fast, so tank the hatchers a few yards away from the ranged dps and healers. The melee based classes will be affected by the growing flames so the faster you kill the hatcher the better.
Blackwing Taskmasters
This is a group of 3 Orcs patrolling the entire area, once it’s time to pull them make sure you sheep two of them and kill the remainder, lots of time the groups are 1 male/2 female or 1 female/2male, pick the odd one out for quick selection.
Basic Strategies Proceed down the right wall utilizing the alcoves when possible; the reason not to clear the left side of the room is because the warlock AoE can reach the second floor and pull all the mobs up there. Once you clear the a section designated by your raid leader, move with your raid to the other end of the room fast, you might get a few adds or pops on the way there but the mages can handle that pretty easily.
Keep a minimum of one rogue stealthed around your raid in case a suppression device should repop, they should be fast to disarm it again. The most important thing is to keep it moving once started; here are some recommended spots to take short (very short breaks); first one is in the first alcove on the right wall, second one is on the ramp up to the next floor, third one is in the first corner on the second floor (again on the right-hand side) and finally the alcove on the right hand wall, the next to last alcove before broodlord. Send a few rogues before the raid to get down the suppression devices and have hunters or MT pull the packs in front of you to clear the way; note you don’t want to kill more mobs than you have to, so keep it to a minimum and stick to the right-hand wall at all times until you reach the first alcove on the right hand side. Once there you’ll also see broodlord, be very careful here he has a huge aggro range and can also detect the sneaky rogues, don’t get closer to him than necessary.
Broodlord Lashlayer
Abilities:
- Mortal strike: Broodlord has one nasty mortal strike that hits the tanks for 5000+ damage depending on the tanks gear.
- Cleave: Frontal/side attack cleaves everyone in the area for around 1300+.
- Short Proximity knockback: This is an area of effect knockback does mild damage and reduces your threat level. This is the key ability, the lowering of threat makes a significant difference in the fight. DPS classes without aggro-wiping abilities will have to throttle back their damage in this fight.
Tichondrius Notes
Broolord is pulled to the corner catty corner from the gate on teh right wall. This is the corner closer to the way the group came in than the gate that is closed. Ranged DPS and healers stand against the gate or slightly to the right in a tight bunch. Mages and Warlocks are primarily responsible for keeping whelp packs down and adding small amounts of damage on Broodlord. Warriors and any designated Bear Druids fight to stay just under the aggro of the main tank and above everyone else so that when the MT get threat reduction the aggro goes to another tank.
Stormrage Notes
Broodlord is pulled from his spot in front of the gate to the corner to the right of the gate. Ranged dps and healers stand with their backs to the gate. Note that this means they have to be awake at the end of the fight and move into the corner as soon as the gate goes up, to avoid an unexpected pull.
Goblin Trash Packs
There are 2 kinds of trash packs in Firemaw's room - the mixed goblin-warlock-spellbinder-overseer packs, and the packs of 3 overseers and one Wyrmguard (larger overseer). To pull Firemaw, 2 of the goblin packs need to be cleared.
First pack:
- 2x Blackwing Warlock - can summon felguards, rain of fire, cannot be sheeped
- 8x Blackwing Technician (Goblins) - have short-range fire AoE, can be sheeped and trapped
Second pack:
- 1x Death Talon Overseer - vulnerable to one of: fire, frost, arcane, shadow, nature, and has special abilities depending on which school it is vulnerable to, i.e. fire overseers have a stacking fire damage debuff that is ~1600+ damage each time it stacks.
- 1x Blackwing Spellbinder - immune to magic, can polymorph (into a squirrel!)
- 2x Blackwing Warlock - see above
- 8x Blackwing Technician - see above
Tichondrius Notes
Stormrage Notes
We're still practicing our tricky pulling on the second pack :)
We kill the warlocks first, be ready to run out of their rain of fire, and our warlocks will be ready to banish the felguards if they are summoned. The goblins are CCd until we are ready for them, sheep as many as possible, and hunter trapping and scattershotting are also used, so don't break CC! On the packs with spellbinders and overseer, the overseer is the next target, mages and locks will test for vulnerability, if it isn't one of the mage/lock schools, it's nature. The spellbinder is typically taken out last.
Firemaw
Abilities:
- Wing Buffet: Frontal cone knockback (Aggro reducer).
- Flame Buffet: Stacking debuff that inflicts 139 - 161 Fire damage to an enemy and increases the Fire damage it takes by 150 for 60 seconds.
- Shadow Flame: Inflicts 3938 - 5062 Shadow damage to enemies in a cone in front of the caster (If the target doesn’t have Onyxia Scale cloak, will receive a DoT that ticks for 2500, it’s a certain death.
Tichondrius Notes
Stormrage Notes
Once the necessary trash is pulled out of Firemaw's room, the tank positions himself in the doorway of the room in such a way as to pull Firemaw by proximity aggro when Firemaw's patrol path hits the doorway.
Firemaw is tanked in the doorway, in a spot that makes it possible for the healers to have Line-of-Sight on the tanks without Firemaw having LoS on them (because of the stacking debuff). DPS classes will obviously need to be in LoS of Firemaw to deal damage, so they will get hit with the Flame Buffet debuff. Once they have 5 debuffs, they should duck out of LoS, and wait for the debuffs to wear off before heading back into the fight. High FR really helps, since you can resist the debuff long enough to reset the stacking.
Tank information: the Wing Buffets will keep you on your toes! When the CTRA warning for a wing buffet goes out, another tank must taunt Firemaw, so that the buffet doesn't hit the MT. If the taunt is resisted, another tank has to be able to jump in with a taunt. Obviously, the tanks are also concerned with the debuffs like everyone else, so stack your FR, and take turns jumping out of LoS to let the debuffs wear off. The MT should have as much FR as possible, in order to hopefully resist the debuff for long enough to reset it. Having 31 debuffs on makes the healers' job difficult!
Goblin Trash Packs
The third pack in Firemaw's room is another overseer-spellbinder-warlock-goblin pack, the goblins and overseer can be pulled first, leaving the spellbinder and warlock behind.
Fourth pack:
- 1x Death Talon Wyrmguard
- 3x Death Talon Overseer
Fifth pack, on the landing between the 2 sets of stairs is another overseer-spellbinder-warlock-goblin pack, and another pack can be found in the room before Ebonroc (sixth pack).
Then, there is a 3-pack of Wyrmguards along with the goblin mob with the Smelt Elementium recipe. These pull together, and the goblin should be sheeped throughout the fight. Afterwards, he can be mind-controlled in order to teach people Smelt Elementium, and then killed.
Tichondrius Notes
Stormrage Notes
We pull the fifth and sixth packs to the bottom of the stairs, in order to gain a little more room.
Ebonroc
- Shadow Flame: Inflicts 3938 - 5062 Shadow damage to enemies in a cone in front of the caster (Onyxia Scale Cloak required).
- Wing Buffet: Frontal cone knockback. (Aggro reducer).
- Shadow of Ebonroc: Puts a curse on the target that make Ebonroc heal for 25,000 HP each time he hits the cursed target (Can’t be dispelled in any way or form). It can be resisted a Shadow Resistance of at least 240 is recommend you will see a resist rate of about 70/80% of all the attempts of him putting the curse on the tank. Duration 8 sec.
Tichondrius Notes
Stormrage Notes
When he is at the bottom of his patrol path, Ebonroc is pet-pulled to the furthest cubby (from him) on the right side of the room. The MT will be on one wall of the cubby, and the OTs on the other side (in order to keep the MT out of the cone wing buffet).
This fight is another tricky tank-fight, where the OTs have to really be on the ball with their taunt timing, since you obviously never want Ebonroc to be hitting the MT when the MT is cursed. Also, be aware that the curse lasts 8 seconds, compared to the taunt duration of 6 seconds, so more than one taunter might be necessary. All taunters (including druids!) should be ready to go in as an OT on this fight. Tanks use SR/physical gear for this fight, in order to hopefully resist the curse, and also the Shadow Flame. Ebonroc doesn't deal fire damage.
This fight is also rough on the healers, since they'll need to watch Ebonroc's target to know which OT to heal.
However, the dps classes have it (relatively) easy on this fight. Make sure to watch your aggro, you don't want Ebonroc charging into the dps and the healers if the MT gets an unlucky buffet.
Flamegor
- Wing Buffet: the same old thing you've seen already.
- Shadow Flame: again, you've seen this before. Wear your OSC!
- Enrage: Flamegor gets enraged at which point he does an fire AoE.
This fight is eerily similar to Firemaw, with the addition of the enrage.
Tichondrius Notes
Stormrage Notes
Since this fight is the same as Firemaw, we fight him in the same place! A hunter pet-pull is used to get him to the doorway of Firemaw's room, but the hunter has to be on his/her toes, since Flamegor will often enrage almost immediately, so the pulling hunter should use tranquilizing shot on him before Flamegor hits the main raid position.
Hunters will be tranq-shotting Firemaw whenever he is enraged. We will have a set rotation, which is posted by the hunter CL in the signup thread for the raid. Know your position!
More Trash
There is at least one 3x overseer (?) pack to be cleared, but I'm not sure if it's before or after Flamegor.
Chromaggus
When Ebonroc and Flamegor are dead, you can access a cubby with a switch. Predictibly, throwing the switch releases Chromaggus. A hunter is a good choice for this job, since they can wait for Chromaggus to get aggro on them, and then feign and he will run at the raid.
Chromaggus will afflict you with "Brood Afflictions" during the fight:
- Brood Affliction: Black: Increases fire damage taken by 100%. (Curse).
- Brood Affliction: Blue: Burns 50 mana every 1 sec. casting speed reduced by 50%.
Movement speed reduced to 70%. (Magic).
- Brood Affliction: Bronze: Periodically stuns for 4 sec. (Can only be removed by Hourglass sand which is dropped by goblin trash mobs).
- Brood Affliction: Green: Deals 250 damage every 5 sec. Healing effects reduced by 50%. (Poison).
- Brood Affliction: Red: Deals 50 damage every 3 second; Heals Chromaggus on death. (Disease)
All can be removed using class abilities except the Bronze, which can only be removed using hourglass sand (which means that the MT/OT and healers will be supplied, but most of the raid will just have to live with the stuns). Note that you never want someone to get all of the afflictions on them, since they will turn into a broodling and turn on their raid-mates.
He also has breaths that he will periodically cast, which should be avoided by ducking into the cubbies, out of Line of Sight. You will get 2 of these breaths, randomly chosen.
- Corrosive Acid: Deals 875 to 1125 damage every 3 sec. Armour reduced by 3938 to 5062. 360 degrees around Chrommagus.
- Time Lapse: Frozen in time! Health reduced by 50%, and Wipes any threat generated. 360 degrees around Chrommagus.
- Incinerate: 3675-4275 Fire damage 360 degrees around Chrommagus.
- Frost Burn: Attack speed reduced by 80%. Does approx 1400 damage. 360 degrees around Chrommagus.
Other Abilities:
- Skin Shimmering: From time to time Chrommagus skin will shimmer and change his resistance to schools of magic; he is resistant to 4 of 5 schools at any one time (Fire, Frost, Shadow, Arcane or Nature).
- Frenzy: Each 15 seconds Chrommagus will go into Frenzy increasing his attack speed and attack power. This frenzy can be removed by a hunter's tranq shot.
At 20%, Chromaggus will enrage, and will do much more damage. Removing the frenzy is particularly important at this time, because you don't want him enraged and frenzied at the same time.
Tichondrius Notes
Stormrage Notes
We tank Chromaggus in the same cubby that we use for Ebonroc. The tanks are in the cubby with him, and the rest of the raid are in the cubby next to that one, except for the hunters and their assigned healer/decurser, who are in the furthest cubby, in order to ensure range for tranq shots.
CTRA gives a 10 second warning prior to the breaths. At this point, everyone should be diving into their cubby to avoid the breath - no one should be getting hit. Note that sometimes bow, gun, or wand auto-shot will be able to work through the walls, make sure you manually turn it off, because if you can hit him, his breath will hit you.
Magic dealers need to be checking for Chromaggus' vulnerability whenever his skin shimmers, in order to do the maximum possible damage to him. Hunters will be doing some damage, but will be mostly concentrating on tranq shots and avoiding breaths.
Nefarian
Wear your Onyxia Scale Cloak!
Some strategy info here.